Brake hose recommendations, certification requirements, and service practices may have changed. Use current DOT-compliant components and inspect routing carefully.
Procedure
Stainless Steel Brake Flex Line Installation – 1994 AUDI UrS4
Why use stainless steel brake flex lines?
The typical SS flex line consists of a Teflon inner tube to carry the brake fluid covered by a braided stainless steel sheath. The tube and sheath is attached to the end fittings by crimping or by using a compression type removable fitting. Some SS lines have a plastic sheath that covers the braid or an inner sheath between the Teflon tube and the SS outer cover. The SS lines have some advantages: 1. The lines can withstand high pressure and don’t expand under pressure like OEM rubber lines. This translates into better brake pedal “feel”. 2. The SS cover is resistant to cutting damage by road debris.
The SS lines also have some disadvantages in everyday use: 1. Grit from road spray works it’s way under the SS outer cover and abrades the Teflon tube. This eventually results in leaks and line failure. Unsheathed SS lines should be replaced every two years. Plastic outer sheathing and Kevlar inner sheathing is designed to prevent this. 2. The SS lines do not stretch. If they are too short for the car, they will eventually pull apart under full suspension travel. 3. There have been reports of “mysterious” SS line failures in normal use. You seldom hear this about OEM rubber lines.
DOT Certification
To be DOT approved, brake flex lines have to meet several criteria. One is that the end connections have to be crimped to the hose. The criteria which most SS lines fail is the “whip” test. The line is attached by one end to a test machine that flails it around. The line has to withstand a specified number of cycles. SS lines usually fatigue and come apart. All racecars use SS lines for the high-pressure rating and lack of stretch, but they are changed on a regular basis. The family bus has a different end use and the lines don’t get changed nearly as often. If you chose to install SS lines, you have to monitor their condition on a frequent basis.
SS Line Installation on a 1994 Audi S4
My old rubber OEM lines were showing signs of checking and there was a suspicious damp spot on the RF line, so it was time to change them out. I chose SS lines because:
1. they were cheaper than OEM lines 2. they improve pedal feel 3. they were cheaper than OEM lines 4. they look nifty (what, you don’t look in wheel wells?) 5. they were cheaper than OEM lines
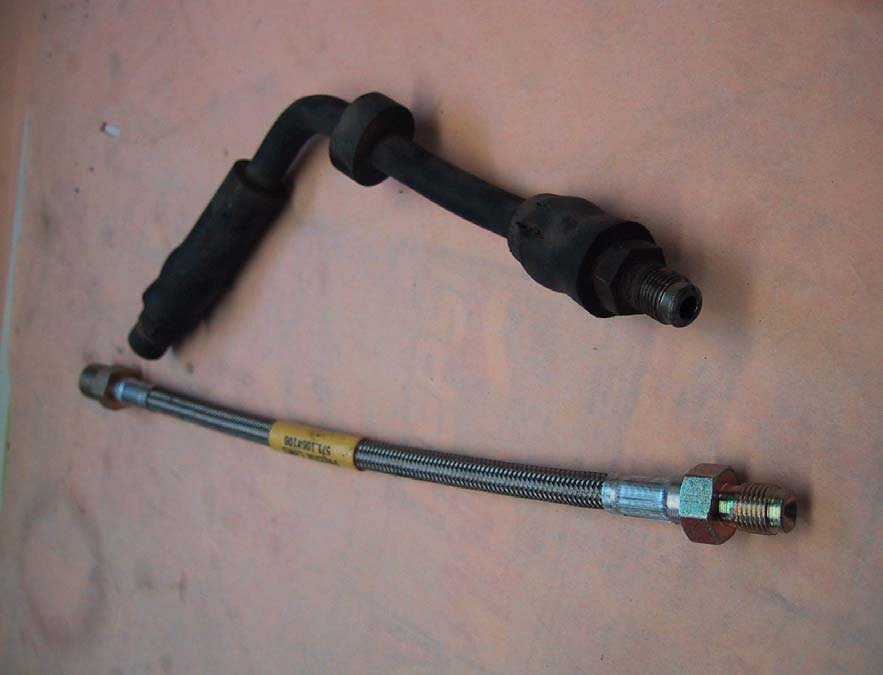
The lines I chose were supplied by Paragon Performance (www.paragonperformance.com) and manufactured by Precise Lines. The lines are DOT approved and have a Kevlar sheath between the Teflon tube and the SS outer cover. The Kevlar sheath gives them the strength required to pass the whip test and helps prevent grit penetration to the Teflon tube. The lines are ½” longer than the OEM lines. Photo 1 shows a comparison between a SS rear line and the old OEM line.
Photo 1 Stainless & old OEM rear brake line
Rear Line Installation
I started with the right rear line since this is first in the bleeding sequence. The rear line (see Photo 1) has one threaded female flare fitting (connects to steel brake line) and one threaded male fitting (connects to the caliper). Break both fittings loose on the line on the car. Also break loose the bleeder screw on the caliper before proceeding to avoid the embarrassment of getting the new line on and not being able to bleed it. The caliper connection should come loose easily but the connection to the steel line may give some trouble on rust belt cars. Use your favorite penetrating oil on both. I had to use the flame wrench on one of my connections.
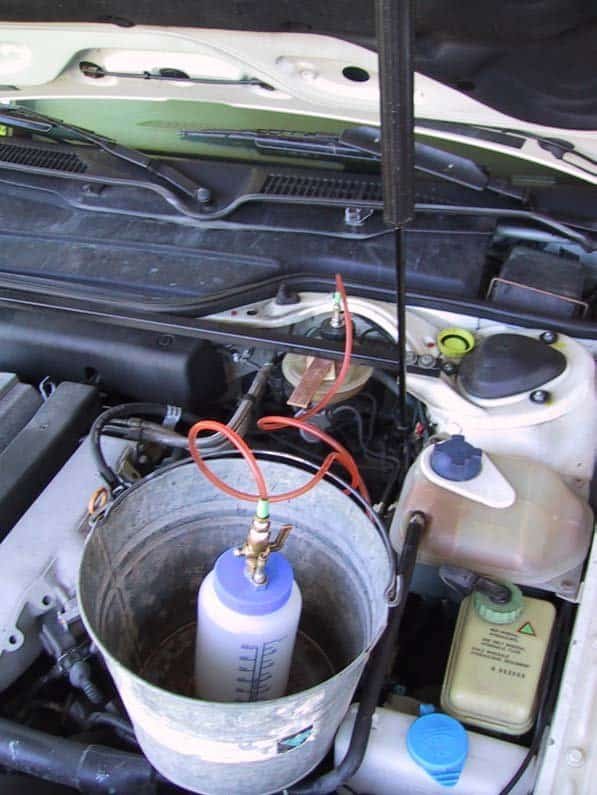
Once the fittings have been broken free, make sure the brake fluid reservoir is full. This is a good time to flush the brake fluid, so you may want to remove the old fluid from the reservoir and fill it with fresh Super DOT4 fluid. The hex on the female end of the flex line fits into the mounting bracket at the steel brake line. This keeps the flex hose from rotating. Remove this end of the old line first, pull it out of the bracket, and then unscrew the line from the caliper. Brake fluid will be dripping out of the end of the steel line, so have a suitable container to catch it. It can drip for quite a while before the reservoir goes empty, but keep an eye on the level – you don’t want to get air into the master cylinder. Hold the new SS line up to the light and look through it. If debris is inside, blow it out with air. Thread the line into the caliper and tighten it. Fit the hex into the mounting bracket and connect the steel line. Make sure you don’t twist the line during tightening – this can cause line failure. Bleed the caliper to remove air from the system. I use a homemade pressure bleeder (see Photo 2). Note the wooden wedges between the top of the reservoir and the stress bar – it ruins your entire day if you blow the reservoir off the master cylinder.
Photo 2 Pressure bleeder
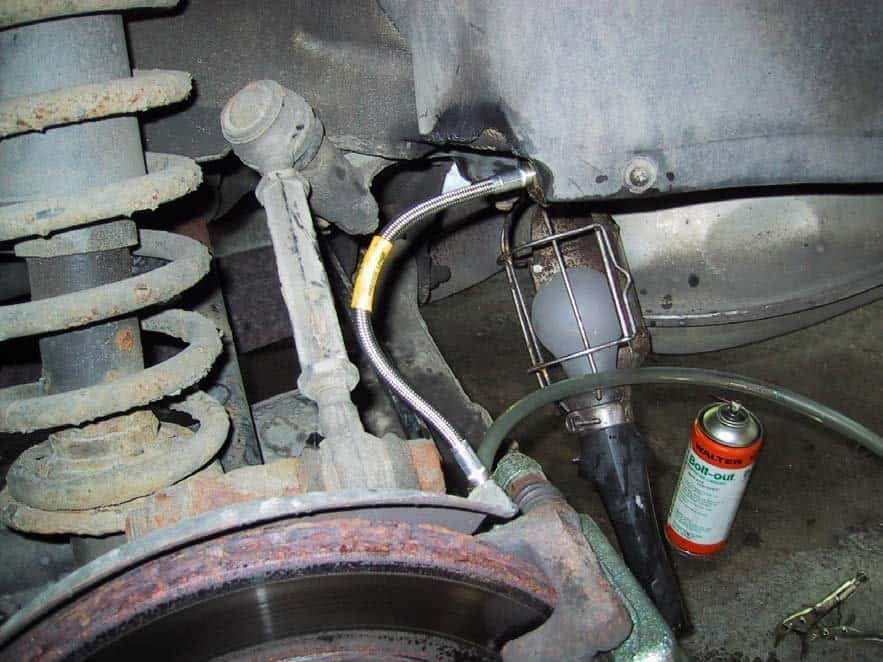
The installed rear line is shown in Photo 3. Note the flame wrench tracks on the fender liner – don’t repeat this part! The suspension is at full extension and there is lots of slack in the new SS line. You also don’t want these lines rubbing on anything – they will cut through almost anything in time. Repeat the process with the other rear line.
Photo 3 New SS Line Installed
Front Line Installation
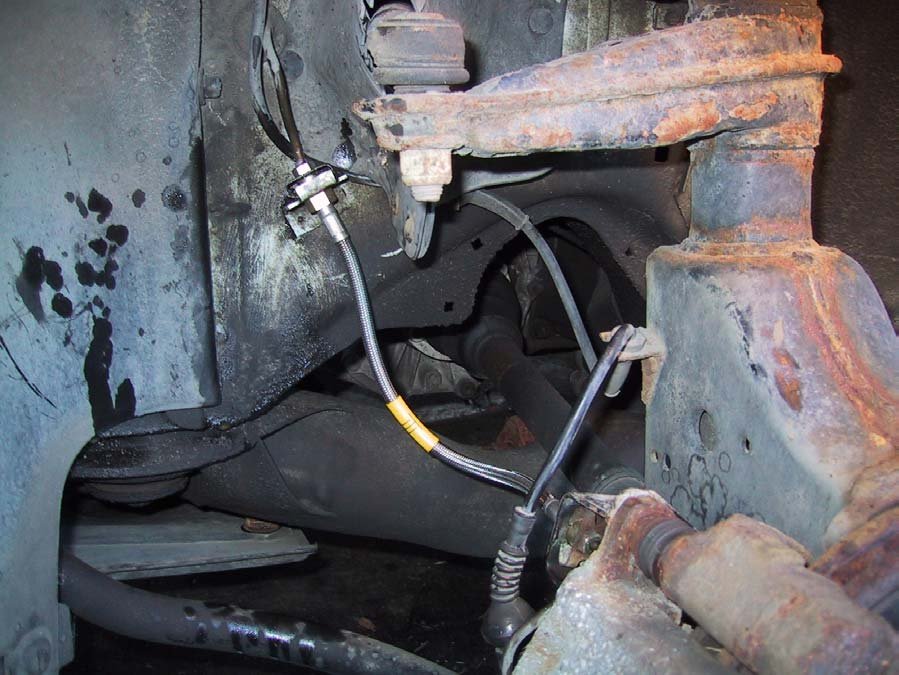
The front flex lines have threaded female flare connections at both ends that connect to steel brakes lines – one from the master cylinder and the other from the caliper. Break both fittings free. You can use a hose pinch clamp on the rubber line to stop fluid loss as you remove the lower connection to the caliper. Remove the upper connection and catch the fluid as it drips out. Again check the new lines for internal debris before installation. The OEM lines have bayonet connections that lock into slots cut into the mounting brackets. The Paragon lines do not have this locking system. The hex fittings have to be held while the male fittings on the steel lines are tightened. Again, make sure the lines do not twist as they are tightened. Also make sure the
steel flex spring on the bracket holds the line securely in the bracket so they don’t move around. Bleed the air out of the caliper. An installed front line is shown in Photo 4.
Photo 4 Installed Front SS line
The suspension is at full extension but the wheel is not turned to full lock. When the wheel is turned, there is just a bit of slack in the line. Yes, I drive in the “rust belt” as is evident from the front strut – I must paint it some day. Repeat with the other front line. After the system is bled, you will find you have also flushed the brake fluid!
Fred Munro ’94 S4
Additional Photos
Related Tech Tips
Revision History
- — Updated
