
Archived procedure. Verify regulator compatibility and charging-voltage specifications for the installed alternator before replacement.
Parts / Part Numbers
068 903 803D
HUCO 13-0512
Procedure
This is a very easy preventive maintenance procedure that you can “DIY= Do It Yourself”. You can replace the Voltage Regulator in your Alternator (also known as Generator) on the spot without removing the Alternator from the car, and it will take you approximately 5 to 10 minutes max.
Parts (you have two options):
! 049 903 515 C brushes only (voltage regulator not included)
! 068 903 803 D Voltage Regulator with brushes included
Part 068-903-803-D is the Voltage Regulator with new brushes included, which means you don't need part 049-903 -515-C. However if you are very thrifty and want to change only the brushes you can go this route, I didn’t cover that below, I opted to change the Voltage Regulator with new brushes already installed (only cost me $20 Canadian).
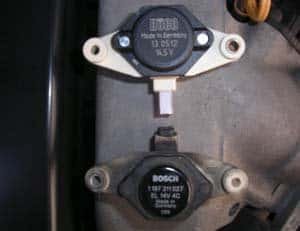
There are a few versions of the replacement "Voltage Regulator" on the market, use the part number above and you’ll get the right one. The original Bosch one says 14V (see pic’s below), I visited my local Auto Parts store and picked up an equivalent unit that is 14.5V (bonus!) also used in VW Passat’s… The unit is a HUCO 13-0512 (also made in Germany, see pic’s below) for $20 Canadian… damn cheap compared to the BOSCH unit at 3 to 4 times that price.
The photo’s that follow depict the condition of an original Voltage Regulator in the original Alternator (also known as Generator) with 165,000 KM or 102,526 Miles of service.
Required tools:
! Stubby Philips screwdriver
! Small metal pick to clean out the screws prior to removing them – Optional
! Small piece of hard plastic about 1 inch long – Optional
Pictures say a thousand words, so I’ve included a few below. Basically it’s this simple… get in a area with good lighting or use a “trouble light”, look from behind the Alternator and you will see the Voltage Regulator in plane sight. Now before you start to remove the screws take a small metal pick and clean out the screw heads… this will ensure your screwdriver does its job properly and you don’t strip the head. Now proceed to remove the screws, and hold your stubby with a firm grip (c’mon you know how), the screws are not in that tight…
Replacing the Voltage Regulator is almost as easy, I found it helped to put a small piece of plastic over the armature while installed the new Voltage Regulator because the new one has long brushes that need to be compressed, if left extended they catch on the lip of the armature. I used a small piece of plastic to help to slide the brushes over the armature. Enjoy the peace of mind that your alternator is now providing strong current and voltage!
Cheers, /James Murray (JAMU)
Original Voltage Regulator located at the back of the Alternator and stubby Philips screwdriver used to remove it, take a look at the condition of those brushes!!!
Voltage Regulator removed from Alternator
New Voltage Regulator next to the old one… What a difference!
Additional Photos
Related Tech Tips
Revision History
- — Updated
