UrS4/S6 Camshaft Position Sensor Replacement

UrS4/S6 Camshaft Position Sensor Replacement

UrS4/S6 Camshaft Position Sensor Replacement Procedure

Tools needed:

  1. Zip ties
  2. 19mm open ended wrench
  3. H6 allen key
  4. Paint pen or some sort of precise permanent marker
  5. Small wire stripper

Parts needed:

  1. EFI Express generic cam position sensor (used in this tutorial) or Audi OE sensor
  2. EFI Express wiring harness kit for sensor (recommended) 
  3. Gates 27042 hose, 5/32” inner diameter hose (about 5” max) in order to replace often brittle factory hose that runs by the cam sensor connector.  Segment from hard line to front of intake manifold. 
  4. Core support hood/bonnet release clips or zip ties (stock units tend to crack easily upon removal)


If you own one of these cars long enough, sooner or later you’re likely to experience a failure of the camshaft position sensor.  As a preventative measure I often like to replace them with every (or every other) timing belt service while doing the camshaft seals.  

A failing camshaft position sensor (aka G40 sensor) will typically cause hard starting issues especially once the car is already warmed up.  This write up isn’t so much about the symptoms as it is the replacement of the sensor so we’ll keep moving forward with that.  

I like to start by removing the front upper core support.  Keep in mind that this requires the removal of the plastic hood release cable guides so make sure you have replacements ahead of time or at the very least have zip ties or some other method to secure the hood release cable upon reassembly.  

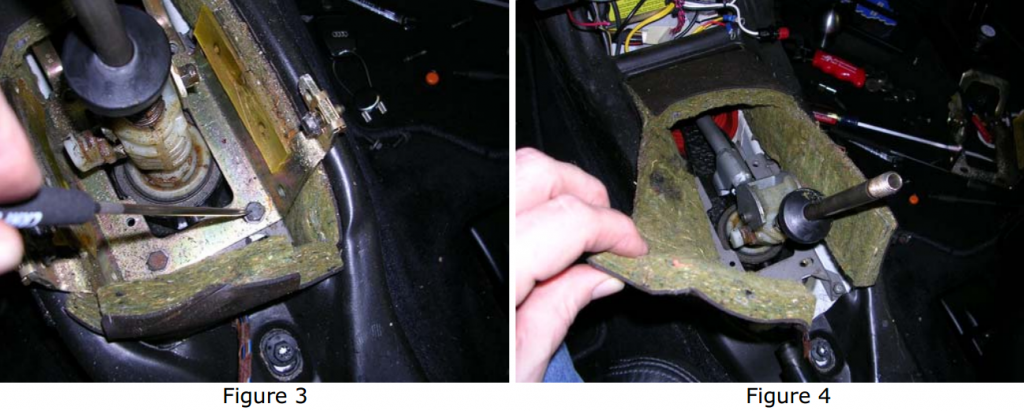
Once the core support is out of the way our next task is to be able to remove the plastic upper timing belt housing cover.  In order to accomplish this we must first move the serpentine belt tensioner out of the way as the cover gets sandwiched behind it.  Some sort basic H6 allen keys often work well here as you will find clearance is a bit of an issue behind the viscous cooling fan.  You do NOT typically need to remove the fan.  Use a 19mm wrench to remove the tension from the belt tensioner and insert an allen key or some other object into the hole in the tensioner to hold it securely in the untensioned position.  Now remove the 3 bolts that hold the tensioner to the bracket and remove it from the car.  The upper plastic belt cover, if still present, can be a bit frustrating as it will sometimes trap the tensioner bolt at the upper left.  Use a little patience or remove the plastic cover via the allen bolt on the back.  

With the serpentine belt tensioner out of the way you should be able to remove the clips that hold the upper timing belt cover in place.  It will still require some careful removal to sneak it out of the space so be careful.  Now we can see the cam pulley so it is time to zip tie the timing belt securely to the pulley in several locations including TDC (top dead center) and make some reference point marks to insure the belt and pulley remain in perfect alignment.

Removal of the bolt for the cam pulley should not be terribly difficult as it should be torqued to only 48 lb ft.  Nonetheless, you will want to find a method to either pin the pulley or prevent it from moving as you remove the bolt.  Do NOT use the timing belt itself as leverage for the removal of the bolt as it could jump a tooth or more on the lower cog and you’ll have much more work to do.  In my case, a strategically placed screwdriver against the head of the cam sensor bolt followed by a quick blip of my impact gun removed the bolt with zero drama or movement.  

With the bolt removed do not immediately pull the camshaft pulley off.  You will first want to get some zip ties in place down by the water pump in order to secure the lower section of the timing belt from moving.  Once you create slack in the belt by removing the upper pulley you run the risk of the belt stepping off of the lower pulley.  It is better to be safe than sorry here.  

With the zip ties in place and ready to be tensioned gently wiggle the cam pulley off.  (A second set of hands is helpful here to hold the pulley while you secure the lower zip ties to secure the lower portion of the belt.)  Carefully lay the cam pulley to one side or the other.

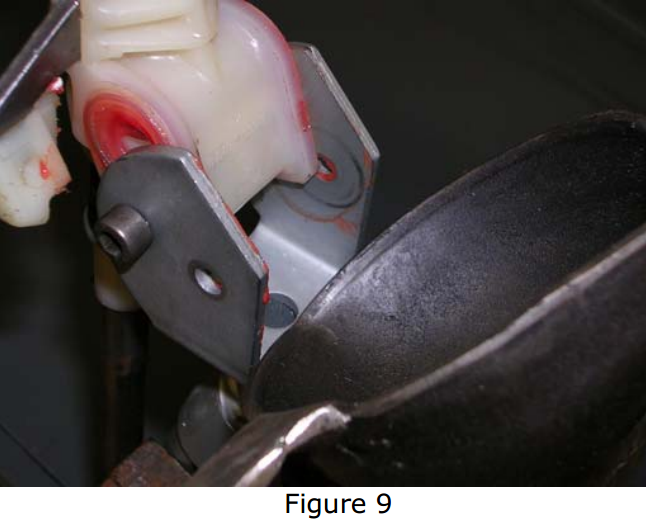
Next we get to remove the actual camshaft position sensor.  It looks easy enough but don’t get in a hurry here.  The bracket is metal and looks strong but it is made from “pot-metal-mache” as I like to say.  The bracket itself can stick to the mounting post even after removing the two allen bolts.  Be very careful about prying it loose with a flat bladed screwdriver.  The key here is the even application of pressure when trying to pry it free.  Start by wiggling it by hand as that is sometimes all that is needed to get it started.  

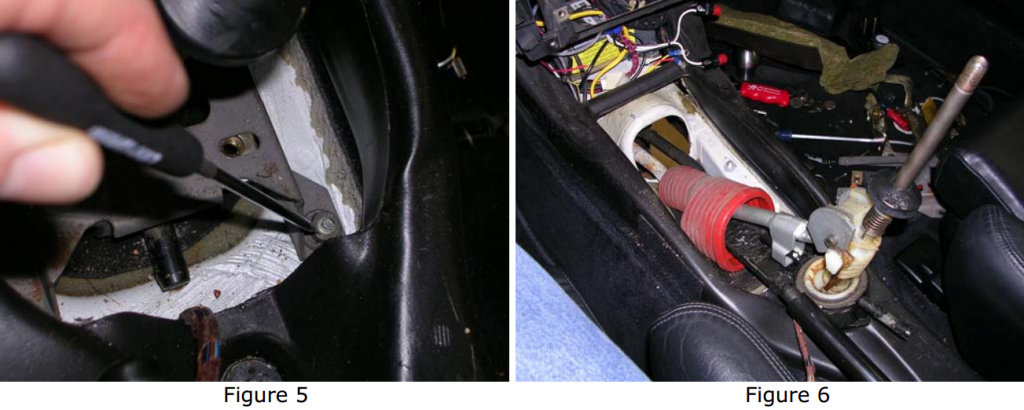
There is one bolt on the plastic rear timing belt shield just under the bottom right corner of the cam position sensor that you will want to remove.  We’re going to sneak the wiring harness out from behind this cover so you’ll need a little flexibility with the shield.  

The other end of the cam position sensor is mounted in a bracket at the front of the fuel injection rail.  Remove the fuel rail cover if it is still intact on your car and you’ll see the connector.  Unplug to top connector and see if you can remove the lower section of the connector from the bracket.  Chances are that a short section of hose from a hard metal line to the left leading over to the front on the intake manifold will be in the way.  Believe it or not, this can be the toughest part of the entire cam sensor replacement process.  If that hose is original to the car it is likely now nearly as hard as a diamond.  It is also attached on one end to a hard line section that can flex a bit and you do not want to damage that section of line. Removal took some real patience and careful work with a razor blade and some needle nose pliers.  Be sure you have some replacement hose on hand before you dig into this job.  (See above referenced parts list for the Gates hose I used to replace mine.)

Once the plug is out carefully remove the original sensor and harness wire from the car while paying attention to the routing method.  We’ll obviously want to install the new sensor and harness in a similar fashion.  

For this write-up, a new sensor and plug harness kit from EFI Express was used.  This is a much cheaper option than buying an original sensor from Audi (if still available) and it works well if you’re willing to do a little work to assemble the wiring harness plug end.  You will need to use your drill and a drill bit slightly larger than the mounting pins for the existing cam sensor to gently drill it out until the old sensor releases from the bracket.  Use caution here as you don’t want to destroy the bracket.  I was able to hold the sensor bracket by hand and carefully drill it out on the workbench.  Remove the Phillips screw that holds the existing wiring harness in place and make note of it’s orientation and routing.  

When you install the new sensor into the existing bracket you will need to expand the end of the mounting pins to hold the new one in place.  These are very delicate and you get one shot at it here so plan ahead.  In my case, a new nail setter punch wound up working well to start it then I set a tack over it and applied pressure to flare it out and secure it in place.  A bit MacGyver but where there is a will there’s a way!  

The new EFI sensor should be wired as follows:

  • RED sensor wire (+5v) to vehicle red wire (pin 1 on new connector)
  • GREEN sensor wire (signal) to vehicle gray/red wire (pin 2 on new connector)
  • BLACK sensor wire (ground) to vehicle brown/red wire (pin 3 on new connector)

It only took 5-10 minutes to make the new sensor plug end with the EFI Express kit.  Caveat, the wires are tiny so if you don’t have great eyesight or dexterity you might find this a bit challenging.  Remember to clean and transfer the old protective sleeve from the old harness or make a new one to protect the three wires as they route back to the cam sensor bracket.  A second set of skilled hands and eyes might be beneficial for some of you here.  🙂

Once you have the new harness ready, simply install it in the same manner as the original.  Remember to reinstall the bolt that holds the rear timing cover in place as well.  

Next we get to put the cam pulley back on.  It is keyed so it should only go on one way.  Cut the lower zip ties that held the bottom section of the belt in place.  You might also find that it is easier to do if you slightly loosen the roller on the belt tensioner as well but that is up to your discretion.  Make sure all of your marks line up as they did during removal.  Once again you’ll want to find a way to secure the pulley from turning as you tighten the bolt to 48 lb ft.  Also, don’t forget to tighten the tensioner roller bolt to 15 lb ft and use a little Loctite if you loosened it as you don’t want this bolt to back out!  Caref

From this point on you simply reinstall the upper timing belt cover carefully and latch it.  Then reinstall the serpentine belt tensioner and use the 19mm wrench again to apply enough pressure to pull the allen key (or whatever you used) to relieve the tension during removal.  Gently let the tensioner loose onto the serpentine belt.  Reinstall your core support and remember to make sure your hood release cable is properly secured.  

All done!  If this is your first time doing this job, budget about two hours from start to finish.  The only parts that typically eat time is building the harness cable if you’re not accustomed to doing that sort of thing and potentially removing the section of hose near the cam sensor harness plug.  The rest is pretty simple and straightforward.  

Drive safe!  Preserve the UrS cars!  


UrS4 camshaft position sensor replacement
Remove serp bet tension so you can remove the tensioner and timing cover
Secure timing belt
Stock Cam Sensor
Sensor bracket
U.S. UrS4/UrS6 Historical Sales Figures By Color

U.S. UrS4/UrS6 Historical Sales Figures By Color

How rare ARE they really?

I think everyone who has ever had any real interest in these cars has heard that they were quite rare. Numerous archived automotive pieces often refer to the 250 car allocation for 1992 quickly selling out but how many were sold each year?

Back when I started S-CARS.ORG in 1998 I reached out to Audi of America in hopes of getting an idea of how many cars were sold here from year to year. At that time I was given the data Old AoA provided sales data which was closer than most I had seen elsewhere but was still not entirely accurate. We knew at best these were rough estimates and perhaps Audi would intentionally give us mixed figures as they didn’t want the competition to know how many (or how few) were really being sold.

The thing is that the Germans tend to be rather meticulous types that fuss over details. It seems almost illogical that they would NOT keep records of their sales from year to year. Without that data how would they handle future production forecasts or decide which color combinations to build? Magical 8 ball? I highly doubt it. I always suspected they knew but weren’t telling… or perhaps nobody at Audi cared to put in the effort to really look into it for those who had inquired.

It wasn’t until late 2016 that I started to see owners getting surprisingly detailed responses from Audi with production number break downs. I was highly skeptical and actually dismissed some of the data I had seen as it was clearly wrong. Case in point, it was initially reported that there were only 6 UrS6 Avants finished in Emerald over Ecru. I could easily disprove that based solely off of old S-Car Registry entries and some old KAR of MN archives and knowledge of current owners. It did however get me thinking and I decided to contact Audi with several VINs of my owns cars and a few friends cars. This time the numbers started lining up and we were at least getting consistent responses for the first time… ever?

I have no idea what may have changed at Audi that would enable them to generate the type of break-downs by color combination that I was now getting but it was an interesting trail to follow so I decided to keep working at it. I had been working with someone named Katie at Audi of America Customer Experience who was extremely helpful and seemed to be able to search the database to get some interesting results. These new numbers actually seem to have at least of shred of accuracy compared with what we’d been told in the past.
It is hard to say that it is 100% accurate but cross checking multiple VINs through several different contacts at Audi Customer Experience seemed to be generating the same results and Katie seemed to grasp what she was doing.

Sadly, as you will see below we didn’t quite finish our research. Instead of Katie’s helpful response we heard from Jamie at Audi who quickly put up a wall blocking our request for the final set of data. Naturally this makes obtaining the last bit of the data we need way more complicated than it needs to be. Audi Customer Experience could learn a lot from Katie… but unfortunately I think many of us have experienced more of the “Jamie” from them in the past. 😉

The next quest aside from filling in the missing data is to start trying to disprove the numbers. Naturally that is easiest to do with the uber rare colors such as Travertine or certain combinations of Tornado Red or Europa Blue. The more cars we can get into the S-Car Registry, the better idea we’ll have of actual survival rates. Even if you just happen to spot one “in the wild” shoot a picture of it with the license plate visible and email it to me at editor AT s-cars.org and I can likely get the data I need to at least log it in the Registry as a survivor. Thanks!

Total U.S. Sales: 297

Tornado Red Exterior Sales:
Tornado Red with Anthracite Leather: 35
Tornado Red with Ecru Leather:

Brilliant Black Exterior Sales: 92
Brilliant Black with Anthracite Leather: 38
Brilliant Black with Ecru Leather:

Pearl White Exterior Sales:
Pearl White with Anthracite Leather:
Pearl White with Ecru Leather:

Emerald Mica Exterior Sales:
Emerald Mica with Anthracite Leather:
Emerald Mica with Ecru Leather:
Emerald Mica with Ecru velour interior:

Crystal Silver Metallic Exterior Sales:
Crystal Silver Metallic with Anthracite Leather:

Cyclamen Red Mica Exterior Sales:
Cyclamen Red Mica with Travertine Leather:
Cyclamen Red Mica with Ecru Leather:

Titanium Grey Metallic Exterior with Anthracite Leather:

Total U.S. Sales: 694 (per AoA on Sept. 1, 2017)

Tornado Red Exterior Sales: 50
Tornado Red with Anthracite Leather: 39
Tornado Red with Ecru Leather: 11

Brilliant Black Exterior Sales: 178
Brilliant Black with Anthracite Leather: 112
Brilliant Black with Ecru Leather: 66

Pearl White Exterior Sales: 188
Pearl White with Anthracite Leather: 125
Pearl White with Ecru Leather: 63

Emerald Mica Exterior Sales: 232
Emerald Mica with Anthracite Leather: 82
Emerald Mica with Ecru Leather: 149
Emerald Mica with Ecru velour interior: 1

Crystal Silver Metallic Exterior Sales: 43
Crystal Silver Metallic with Anthracite Leather: 43

Cyclamen Red Mica Exterior Sales: 12
Cyclamen Red Mica with Travertine Leather: 1
Cyclamen Red Mica with Ecru Leather: 11 (estimated)

Titanium Grey Metallic Exterior with Anthracite Leather: 2

Total U.S. Sales: 399 (per AoA on Sept. 27, 2017)

Tornado Red Exterior Sales: 20
Tornado Red with Anthracite Leather: 15
Tornado Red with Ecru Leather: 5

Brilliant Black Exterior Sales: 87
Brilliant Black Exterior with Anthracite Leather: 50
Brilliant Black Exterior with Ecru Leather: 37

Crystal Silver Metallic Exterior Sales: 30
Crystal Silver Metallic with Anthracite Leather: 29
Crystal Silver Metallic with Platinum Leather: 1

Pearl White Exterior Sales: 112
Pearl White with Anthracite Leather: 77
Pearl White with Ecru Leather: 35 (one other data point says 5 cars)

Emerald Mica Metallic Exterior Sales: 144
Emerald Mica Metallic with Anthracite Leather: 35
Emerald Mica Metallic with Ecru Leather: 108
Emerald Mica Metallic with Ecru Velour: 1

Europa Blue Mica with Ecru Leather: 6

Total U.S. Sales: 930 (includes 95 and 95.5) (per AoA on Sept. 26, 2017 )

Brilliant Black Exterior Sales: 298 (one other report says 246)
Brilliant Black with Platinum Leather: 1
Brilliant Black with Anthracite Leather: 146
Brilliant Black with Ecru Leather: 60
Brilliant Black with unknown interior: 33

Casablanca White Exterior Sales: 11
Casablanca White with Anthracite Leather: 9
Casablanca White with Ecru Leather: 1
Casablanca White with unknown interior: 1

Cashmere Grey Mica Exterior Sales: 43
Cashmere Grey Mica with Platinum Leather: 5
Cashmere Grey Mica with Ecru Leather: 1
Cashmere Grey Mica with Anthracite Leather: 28
Cashmere Grey Mica with unknown interior: 9

Crystal Grey Mica Exterior Sales: 71
Crystal Grey Mica with Platinum Leather: 30
Crystal Grey Mica with Anthracite Leather: 41

Tornado Red Exterior Sales: 73
Tornado Red with Anthracite Leather: 47
Tornado Red with Ecru Leather: 24
Tornado Red with unknown interior: 2

Europa Blue Mica Exterior Sales: 34
Europa Blue Mica with Ecru Leather: 12
Europa Blue Mica with Platinum Leather: 12
Europa Blue Mica with Anthracite Leather: 1
Europa Blue Mica with unknown interior: 9

Pearl Effect White Exterior Sales: 39
Pearl Effect White with Anthracite Leather: 15
Pearl Effect White with unknown interior: 24

Pearl White Metallic Exterior Sales: 74
Pearl White Metallic with Ecru Leather: 35
Pearl White Metallic with Anthracite Leather: 39

Emerald Mica Metallic Exterior Sales: 221
Emerald Mica Metallic with Anthracite Leather: 31
Emerald Mica Metallic with Ecru Leather: 128
Emerald Mica Metallic with unknown interior: 62

Unknown Exterior Color: 63
Unknown with Anthracite Cloth: 1
Unknown with Platinum Leather: 29
Unknown with Anthracite Leather: 32
Unknown with Unknown: 1

Total U.S. Sales: 459 (per AoA on Sept. 1, 2017)  Data is obviously incomplete.
One other report shows 549 sold but majority have reported 459.

Tornado Red Exterior Sales: 24
Tornado Red with Anthracite Leather: 15
Tornado Red with Ecru Leather: 9

Pearl Effect White Exterior Sales: 32
Pearl Effect White with Anthracite Leather: 15
Pearl Effect White with Ecru Leather: 5
Pearl Effect White with Platinum Leather: 12
*Several conflicting reports for pearl sales figures. Some say 32 total sold, one other reports 15 sold. More data needed before we’d be comfortable declaring these as truly accurate.

Emerald Mica Exterior Sales: 115
Emerald Mica with Anthracite Leather: 19 (previously reported as 83 -likely incorrect)
Emerald Mica with Ecru Leather: 96 (96 estimated based on 19 Emerald/Anthracite. Previously reported as 32)

Cashmere Grey Mica Exterior Sales:
Cashmere Grey Mica with Anthracite Leather: 15
Cashmere Grey Mica with Ecru Leather:

Aluminum Silver Metallic Exterior Sales: 63
Aluminum Silver Metallic with Anthracite Leather: 32
Aluminum Silver Metallic with Platinum Leather: 29
Aluminum Silver Metallic with Ecru Leather: 2

Brilliant Black Exterior Sales: 114
Brilliant Black with Platinum Leather: 27
Brilliant Black with Black Leather:
Brilliant Black with Ecru Leather:

Europa Blue Mica Exterior Sales: 29
Europa Blue Mica with Ecru Leather:
Europa Blue Mica with Platinum Leather:
Europa Blue Mica with Anthracite Leather: 2

We Need Your Help!

As many of you know, for several months I have been digging for VINs for each color combination of UrS4 and UrS6 (and Avant) in the U.S. in order to get import numbers and data on each. So far I’ve had a very good connection at Audi (many thanks Katie!) that has been assisting me all along. I’m in the home stretch now and had sent my final email that would help fill in the blanks. On December 21st, 2017 I received the following response (see image) from someone named Jamie at Audi of America stating that they could no longer help me with this information.

How about that for a nice lump of coal from Audi of America just in time for Christmas? Apparently rather than me efficiently compiling a list of color combinations with VINs in one email they could just research and reply to they’d rather get hundreds of emails from individual owners asking the same thing over and over again. Fine. Let’s blow up their inbox with UrS4 and UrS6 production number requests and maybe they will “listen” to their long time enthusiasts.

If you own a U.S. model 1992 or 1995 (1995.5) Audi S4, S6, S6 Avant please help me out by sending the following info to Audi using the form below. Please remember to forward your response from Audi to us at editor@s-cars.org

Seeking Audi sales figures for my car

Sony/Blaupunkt 10 CD Changer

Sony/Blaupunkt 10 CD Changer

The Audi 10 CD changer was manufactured by Blaupunkt under license from Sony, which would make it a Blau/Sony with Audi markings. I figured that a Sony was going to be easier to find, so that’s what I ended up with. The unit in my car is a Sony CDX-A30, which fits the stock mounting brackets perfectly.

AFAIK, as long as it has the single 13 pin DIN cable hookup (the blue cable shown in the picture) it should interface properly with the stock radio and transceiver (the transceiver is what makes the changer visible to the radio).

Part numbers:
Transceiver: 4A0 035 239 (Blaupunkt 7 607 765 082)
Bracket: 4A5 035 113 (sedan)
Cover: 4A0 863 716 (sedan)

FWIW, a quick search on “Sony CDX-A30” at deja.com turned up the following information – Caveat emptor, no warranty expressed or implied, etc. 😉

John Durbin wrote:

In chronological order:
Sony CDX-A20 OK, a little noisy esp. with some head models
Sony CDX-A30 Watch for leaky caps taking out the +/- 5V DC converter Sony CDX-A2001 30V supply driving the audio stage, nice D/A converter Sony CDX-A15 Leaky cap problem solved during CDX-A15 production Sony CDX-A100 suspension, last of the big rotary loaders Sony CDX-A55 DIN cable is M-M instead of M-F, jams to clear

John Durbin, DEI Audio

Steve

UrS4 / UrS6 Airbag Warning Light Fix

UrS4 / UrS6 Airbag Warning Light Fix

This procedure addresses the false two-minute airbag warning light that occurs upon vehicle startup for some vehicles.

Tools:

vehicle maintenance records
thin blade screwdriver
4 mm allen wrench
VAG-COM
flashlight

Procedure:

If you have a ’92, verify that the KF14 recall was done on your car. If so, you have an AIRBAG II system. The dealer can tell by your S/N if the recall was done. If not, then let the dealer upgrade your airbag and fix the light for free! Pry the trim piece off that surrounds your HVAC Central Control. BE CAREFUL to go slowly. See the procedure here: HVAC Head Unit Trim Removal. Unscrew the two 4 mm Allen Head screws that hold on the trim piece spring clips. Lift out the central control unit and swing it out so it rest on the passenger seat. Use a flashlight to help you see the AIRBAG triggering unit (labeled as such). Note the connector on the left side of the triggering unit and note the grey foam that is just above the connector. Inside the foam are the two 2-pin connectors that hook up to the VAG-COM. These connectors are identical to the ones under the left side of the hood, used to access fault codes. Push back the foam to connect the VAG-COM. Turn vehicle ignition to ON. Follow the VAG-COM menu to view and clear your fault codes: Menu 1 – Click Select Menu 2 – Click 15 – Airbags

Menu 3 – Click Fault Codes – 02

Menu 4 – Click Clear Codes – 05


Install is reverse of uninstall. You’re finished!

Rob Pecsar

Europrice Short Shift Kit Installation

Europrice Short Shift Kit Installation

While this write-up is specific to the Europrice SSK, it should be applicable to any SSK that replaces the whole shifter assembly, and can be used to R&R the stock shifter assembly if replacing worn parts. Read though the whole procedure first, as there are some reference marks that will be useful during reassembly. Make sure your shifter is in neutral.

Step 1: Remove rear console. Thisis described in a separate write-up.
Step 2: Remove front console. This is described in a separate write-up.
Step 3: Remove crossmember. Crossmember isheld on with ten (10) 13mm nuts (Figure 1).

Figure 1 and 2

Step 4: Separate exhaust system from downpipe. If you have a Stromung, you will need to remove the center section only. If you have a stock system, you may get away with only having to remove the cats, but will probably have to slide the rest of the system rearward for clearance to work.
Step 5: Remove two (2) 13mm retaining bolts from torque rod and shift rod connections (Figure 2). Along extension on a 3/8 ratchet worked for me. You shouldn’t need a universal joint. Mark the torque and shift rods for insertion depth into the forward rods for reference before removal.
Step 6: Remove the four (4) 10mm bolts holding the top portion of the stop bracket, and remove the bracket (Figure 3). Take notice of bolt positions asthese hold the rear locator that accepts the pin on the rear of the shift assembly.

Figure 3 and 4

Step 7: Remove the insulation blanket from around the shifter assembly (Figure 4).
Step 8: Remove the four (4) 10mm nuts holding the lower portion of the stop bracket, and remove the bracket (Figure 5).

Figure 5 and 6

Step 9: Remove the whole shifter assembly with weather boot by lifting up and out towards the rear. You may have to wiggle it slightly to get everythingmoving (Figure 6). Don’t be concerned with the splines on the torque and shifter rods. The forward rods attached to the transmission are not splined on the inside at the connection points.
Step 10: Clean and transfer the weather boot to your SSK. Measure and transfer your insertion depth reference marks made in Step 5 to the SSK rods.

Weighting of SSK shift rod
If you do not plan to weight your shift rod, skip this section and go to the Reassembly Tips section.
Step 11: Lock your SSK in a vise as shown (Figure 7).
Step12: I went to Pep Boys to ask if I could grab some used wheelweights out of the junk bucket next to the tire changer. While I was rummaging through to find the cleanest ones I could, one of the mechanics came up and gave me a box of brand new ones. Score! Anyway, you need to obtain some lead wheel weights. I used approximately 14oz of weights to fill up the hollow in the shift rod.

Figure 7 and 8

Step 13: Remove the steel clips from the wheel weights. Heat the weights in some type of container. I used a plumber’s ladle (Figure 8) I had which was used for running lead plumbing joints way back when. You can still get these fromplumbing supply housesfor around $35 if you are so inclined. I used an acetylene “B” tank for my heat source.
Step 14: Heat the weights until they liquefy, and pour into the shift rod (Figure 9). You should probably wear a mask when heating the lead asI’m sure lead fumes are not good to inhale.

Figure 9

Re-assembly Tips
Step 15: I used anti-seize on the torque and shift rod ends to facilitate disassembly again in the future. Reinstall the SSK through the opening inthe floor. Line up the rod connections from underneath. There are no splines onthe inside of the forward rods, so don’t worry about alignment. Get the retaining bolts started to keep everything from coming apart.
Step 16: Reinstall the lower portion of the stop bracket, and tighten. Make sure you slip the rubber support over the pin on the rear of the shifter assembly. Reinstall the top portion of the stop bracket. Before tightening the bracket in place, make sure your transmission is still in neutral, and align your side-to-side shifter assembly position (for neutral). Tighten down the top portion of the stop bracket.
Step 17: Set the front-to-back shifter assembly position (for neutral) by adjusting to the marks on the torque and shifter rods made in Step 5. Tighten the torque and shift rod retaining bolts. Reinstall the insulation blanket around the shifter assembly.
Step 18: Reinstall your front and rear consoles and you’re done.

FAQ by Steven Young
You can also download this FAQ as a PDF.

AAN Compression Test – Acceptable Specifications

AAN Compression Test – Acceptable Specifications

The acceptable “Compression Pressures” are:

Specified Value: 9.0 to 13.0 Bar (131 to 189 psi) (ED: 1 BAR = about 14.5 psig)
Wear Limit: 7.0 Bar (102 psi)
Maximum permissible pressure difference between individual cylinders: 3.0 Bar (44 psi)

I do not like to see more then 10%– but that is me and does not mean that your engine might have unacceptable leakage. Perform a leak down test and see if it can be determined where the leak is coming from. If you hear it out of the CC breather or oil fill then you may have ring wear. With the hard cylinder coating and the ring design these days, I have found that cylinder leakage is not as common.

More often you hear it out of the exhaust or intake. Have a friend go back to the exhaust tip if you run it again to take a listen.

If it is the valve seating (I assume you did this at TDC) you may simply have carbon build up and a good tank of BG44 may improve your readings.

Contributors: Mark T / Dave F