The S-CARS.ORG Used Parts store is not yet accepting online orders however the items shown within are available to purchase. Contact us at editor@s-cars.org for personal order support. Dismiss
While this write-up is specific to the Europrice SSK, it should be applicable to any SSK that replaces the whole shifter assembly, and can be used to R&R the stock shifter assembly if replacing worn parts. Read though the whole procedure first, as there are some reference marks that will be useful during reassembly. Make sure your shifter is in neutral.
Step 1: Remove rear console. Thisis described in a separate write-up. Step 2: Remove front console. This is described in a separate write-up. Step 3: Remove crossmember. Crossmember isheld on with ten (10) 13mm nuts (Figure 1).
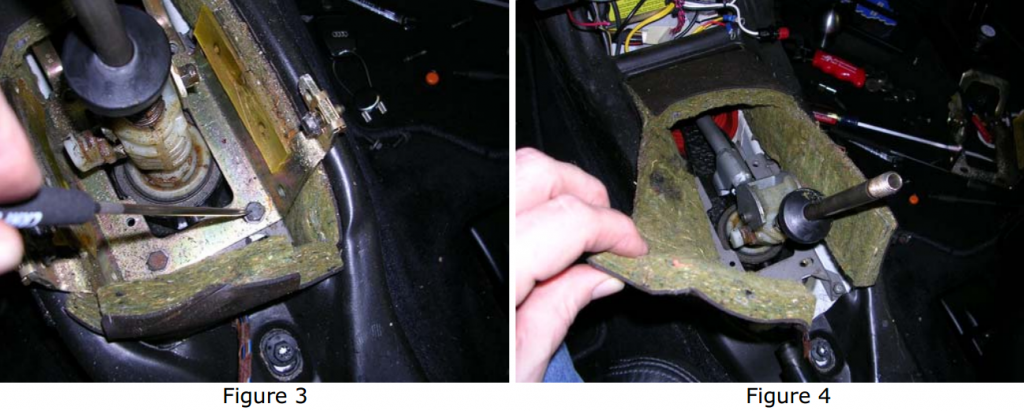
Step 4: Separate exhaust system from downpipe. If you have a Stromung, you will need to remove the center section only. If you have a stock system, you may get away with only having to remove the cats, but will probably have to slide the rest of the system rearward for clearance to work. Step 5: Remove two (2) 13mm retaining bolts from torque rod and shift rod connections (Figure 2). Along extension on a 3/8 ratchet worked for me. You shouldn’t need a universal joint. Mark the torque and shift rods for insertion depth into the forward rods for reference before removal. Step 6: Remove the four (4) 10mm bolts holding the top portion of the stop bracket, and remove the bracket (Figure 3). Take notice of bolt positions asthese hold the rear locator that accepts the pin on the rear of the shift assembly.
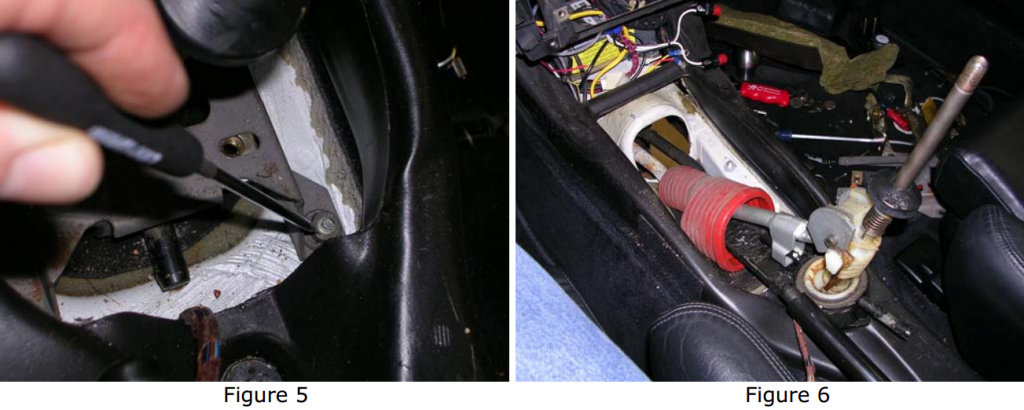
Step 7: Remove the insulation blanket from around the shifter assembly (Figure 4). Step 8: Remove the four (4) 10mm nuts holding the lower portion of the stop bracket, and remove the bracket (Figure 5).
Step 9: Remove the whole shifter assembly with weather boot by lifting up and out towards the rear. You may have to wiggle it slightly to get everythingmoving (Figure 6). Don’t be concerned with the splines on the torque and shifter rods. The forward rods attached to the transmission are not splined on the inside at the connection points. Step 10: Clean and transfer the weather boot to your SSK. Measure and transfer your insertion depth reference marks made in Step 5 to the SSK rods.
Weighting of SSK shift rod
If you do not plan to weight your shift rod, skip this section and go to the Reassembly Tips section. Step 11: Lock your SSK in a vise as shown (Figure 7). Step12: I went to Pep Boys to ask if I could grab some used wheelweights out of the junk bucket next to the tire changer. While I was rummaging through to find the cleanest ones I could, one of the mechanics came up and gave me a box of brand new ones. Score! Anyway, you need to obtain some lead wheel weights. I used approximately 14oz of weights to fill up the hollow in the shift rod.
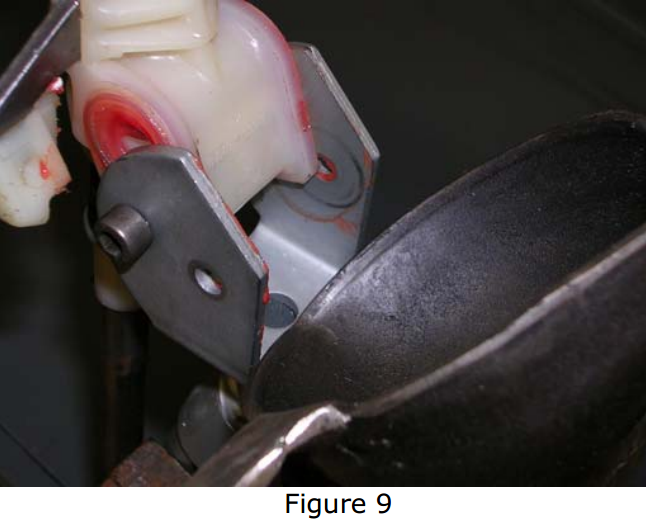
Step 13: Remove the steel clips from the wheel weights. Heat the weights in some type of container. I used a plumber’s ladle (Figure 8) I had which was used for running lead plumbing joints way back when. You can still get these fromplumbing supply housesfor around $35 if you are so inclined. I used an acetylene “B” tank for my heat source. Step 14: Heat the weights until they liquefy, and pour into the shift rod (Figure 9). You should probably wear a mask when heating the lead asI’m sure lead fumes are not good to inhale.
Re-assembly Tips Step 15: I used anti-seize on the torque and shift rod ends to facilitate disassembly again in the future. Reinstall the SSK through the opening inthe floor. Line up the rod connections from underneath. There are no splines onthe inside of the forward rods, so don’t worry about alignment. Get the retaining bolts started to keep everything from coming apart. Step 16: Reinstall the lower portion of the stop bracket, and tighten. Make sure you slip the rubber support over the pin on the rear of the shifter assembly. Reinstall the top portion of the stop bracket. Before tightening the bracket in place, make sure your transmission is still in neutral, and align your side-to-side shifter assembly position (for neutral). Tighten down the top portion of the stop bracket. Step 17: Set the front-to-back shifter assembly position (for neutral) by adjusting to the marks on the torque and shifter rods made in Step 5. Tighten the torque and shift rod retaining bolts. Reinstall the insulation blanket around the shifter assembly. Step 18: Reinstall your front and rear consoles and you’re done.
It is hard to believe that my UrS4 is now 20 years old. It certainly doesn’t look it, especially after a good spring detail. It also doesn’t look like it has covered more than 180,000 miles. In fact, it still does quite well in the regional car shows. This isn’t even some California cream puff. My car started life here in America in Michigan before coming into my care in Iowa (and now Minnesota.) All of these states have harsh winters and lots of road salt! My car survives!
I know several other friends here in the Twin Cities area that are still driving their C4 S4 or S6 as a daily driver as well. They somehow remain reliable enough for daily driving even after all these years. Amazing!
With that in mind, I decided that it would be fun to feature some of you who are still living with a UrS4 or UrS6 on a daily basis. I invite you to send me your ownership stories and photos to be featured here on S-CARS.ORG. Hopefully we’ll hear from people all over the world and publish some of their ups and downs of ownership.
Want to share your story? Simply email it to me at ed****@****rs.org and include any photos of you or your car that you’d like to have included.
Let’s face it, if you own and drive an original S4 or S6 you’ve got an old car. These cars are special and in many cases they have been maintained to high standards thanks to enthusiastic owners. Unfortunately, that isn’t always the case so some cars end up looking, well, a bit tired.
I’ve known the owner of this black S6 online for quite sometime but only recently had the opportunity to connect with him in person at the Glacier Lakes Quattro Club Spring Ice Out event. The owner (Tom) drives a nicely tuned black UrS6 that at the time of this posting is going on 260,000+ miles! Mechanically the car it doing well but the paint has certainly seen better days. At the Ice Out event I told Tom that we needed to get together and work on buffing his car back to life. That day finally came on Saturday, August 19th, 2012.
I’ll be honest, I wasn’t sure I could save Tom’s finish using the limited buffing pads and compound that I had on hand. Since the oxidation on Tom’s car was pretty severe I would have liked to start with a more aggressive pad and compound but we sort of planned our get together at the last minute so I decided to run with what I had on hand… my Porter Cable buffer, two orange foam pads and 3M Finesse It II polishing compound. This combo isn’t terribly aggressive and is what I normally use on my own UrS4 each spring. I didn’t know if it would be enough to save Tom’s UrS6.
As with any detailing effort start with a very good car wash… and by that I mean do it by hand with soap. We used Turtle Wax T-79 Zip Wax Liquid Car Wash
but you can substitute your favorite here. Once the car is washed dry it VERY well and let it sit until all the water is done running out of the body seams (it helps to blow it out with compressed air too if available).
Next I will generally go over the car with the Mothers California Gold Clay Bar System to remove any remaining surface contaminates. This step helps your finished surface feel extra smooth to the touch.
Now the car is ready for buffing. For this step I’m a big fan of the Porter Cable buffers. In my own garage I use a slightly older version of this Porter Cable 5.5 x 7/8 Inch CCS Foam Pad Kit kit. On most cars I use an orange foam pad in conjunction with 3M Finesse-It II Glaze to achieve a very nice shine without being too aggressive. This is also what we used on Tom’s car even though we could have started out with a more aggressive pad and polish and done multiple stage buffing to achieve best results. Since I had only an orange pad and Finesse It II and one day to get it done we opted for the single pass attempt.
The car buffed back to life with amazing results. Granted, there are still some imperfections in the paint but for a simple single stage buffing the car looks night and day different. Had I done things the long way I think I could have brought the car back to 98% or so but it would literally take me 3 days or so to give it that sort of attention.
To finish things off, we gave the entire car a coat of Turtle Wax F21 Car Polish. I know this may seem somewhat crazy as F21 is an inexpensive non-wax based polish but I have honestly used dozens of products over the years on my own and other people’s cars and when it comes down to a product that gives me a nice even shine, ease of application and removal and a long lasting shield for cars that sit outside a lot this F21 is a great solution. It is virtually the only product I’ve used that doesn’t make me hate life while trying to get a nice deep and even shine on my Tornado Red UrS4. Naturally, feel free to use whatever you like the best.
To finish things off I use a little Mother’s Quick Detail spray (included in the clay bar kit mentioned above) and a white foam finishing pad to quickly go over the entire car for a nice uniform shine.
If you own an original Audi S4 or S6 model (1992-1997) you might like to know that Audi here in the U.S. has a special on the fuel tanks remaining in their stock. These normally run a whopping $903 but can be had at big discounts right now. I just ordered one for $173.67 out the door with tax here in MN.
If you live in rust prone areas don’t be surprised if you see your tank start leaking around the seams at some point. Granted, your fuel lines under the car will start leaking first more than likely but your tank won’t be too far behind.
The Bentley shows fewer parts than the above diagram and no Item 19 lock ring. It seems to show pulling the Item 6 cover and the Item 25 flange shaft. It shows the Item 22 round seal (O-ring?) but
does not show the Item 23 radial shaft seal.
Anybody with any BTDT experience on replacing the Item 23 radial shaft seal.
This website uses cookies to improve your experience. We'll assume you're ok with this, but you can opt-out if you wish. Cookie settingsACCEPT
Privacy & Cookies Policy
Privacy Overview
This website uses cookies to improve your experience while you navigate through the website. Out of these cookies, the cookies that are categorized as necessary are stored on your browser as they are essential for the working of basic functionalities of the website. We also use third-party cookies that help us analyze and understand how you use this website. These cookies will be stored in your browser only with your consent. You also have the option to opt-out of these cookies. But opting out of some of these cookies may have an effect on your browsing experience.
As an Amazon Associate I earn from qualifying purchases.
Necessary cookies are absolutely essential for the website to function properly. This category only includes cookies that ensures basic functionalities and security features of the website. These cookies do not store any personal information.
Any cookies that may not be particularly necessary for the website to function and is used specifically to collect user personal data via analytics, ads, other embedded contents are termed as non-necessary cookies. It is mandatory to procure user consent prior to running these cookies on your website.


You must be logged in to post a comment.