1992 – 1997 Audi S4 S6 Ignition Switch Replacement
If you own one of these cars long enough there is a good chance that someday you’ll experience a failed ignition switch. When the switch fails it typically sticks in the ‘start’ position which will keep the starter engaged and cause things such as your power windows, radio, and climate control to stop functioning.
If you look in the factory repair manual it will tell you to remove the entire steering wheel and instrument cluster. While that would make access easier it is not essential to do so. For the process detailed below both the steering wheel and instrument cluster were left in the car. The cluster will be repositioned in order to allow for access to the switch however it was not unplugged or removed from the car.
OK, so what will you need for this operation?
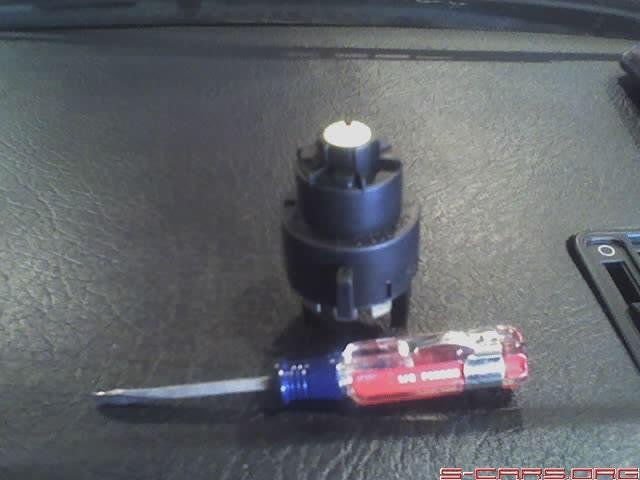
- Small flat screwdriver (see photo for an idea on the size)
- Medium Phillips screwdriver
- Small towel to cover top of steering wheel switch panel (to avoid scratching it with instrument cluster once moved out of the way)
- Telescoping mirror (comes in very handy although not essential)
- Light. A small fluorescent work light worked well for my purposes. Just don’t use anything HOT as you don’t want to melt any of the wiring harnesses in the dash.
- Thread locker (Loctite etc.)
- A few cotton swabs (Q-tips)
- New Ignition Switch. Audi Part Number 4A0 905 849B
- Patience.. and smaller hands help too. 😉
- A telescoping magnet retrieval tool may come in handy as well… in the event you drop something in the dash. Let’s hope for the best however!
- Time: If you are new to this sort of thing allocate about 2 hours start to finish. If all goes in your favor and you’re a handy individual I suspect it could be done in about 45 mins.
Let’s get started… step by step:
- Remove the lower instrument cluster bezel trim. There are two Phillips type screws that you will need to remove first. one is up from the ignition itself and the other is on the opposite side of the steering wheel. once the screws are out pull the bezel from the far left (USA driver side) out and toward the left. There is a small peg that goes into the passenger side of the dash that helps hold the trim piece in place. That part was simple enough right?
- Now we need to get the instrument cluster out of the way. It is held in place by three more phillips type screws located along the bottom of the cluster. These screws go through clips that help hold the cluster in place.
- Drop your steering wheel to the lowest position and then cover the top portion of the wheel and stalk with your towel.
- Time to pull the instrument cluster out a bit. Grab it at the bottom and pull out… these can be a bit snug so be forewarned! I generally find that pulling and wiggling a bit more from the passenger side helps it slide out. We’re not pulling it all the way out, we’re just going to reposition it so we can get at the switch. (While the cluster is in this state it might be a good time to replace or upgrade your cluster illumination as well.)
- Now we need to remove the switch itself. Keep in mind we’re only going to be doing the electrical portion of the switch and not the entire lock cylinder. Make sure your ignition switch is in the OFF position. (Being left handed I found that working from the passenger seat suited me better but your preference may differ.) There is a small relay box looking part to the upper right of the switch… it has a clip that just slides on to part of the car. Slide it off and set it to the side for extra room. There are two small flat screws that must be loosened before you can remove the switch assembly. You can spot these screws because they are typically visible as two small red dots. The red dots are the thread locker used at the factory once the switch was installed. You now have the rather tedious task of removing the thread locker in oder to get at the screws. I was able to do this with a little force and repitition with my small flat screwdriver. Just keep at it and use a damp swab to clean the area as you work. Don’t get too crazy here as you don’t want to end up stripping out the screws. Eventually you’ll get to the point where you can’t turn the screws out (counter-clockwise) with a little effort. They are tough to turn at first. Do NOT take them all the way out. See the photo illustration for an idea of how far to go.
- You’ve got a screw loose? Well, two of them actually… on the ignition switch. Depending upon how much fun you had getting at those little screws you might feel as if you have a screw loose elsewhere as well. Have no fear, the painful part is almost over. Now use your small flat screwdriver to gently pry the switch portion out of the surrounding bracket. I left the connector plug attached at the rear. It takes a bit of effort in a very confined space but it should slide back and out. I went back and down toward the center console of the car. From there I could work it back up and out. (Note: I chose to leave it plugged in during removal and installation as it gave me a bit more to hang on to when wrestling for the correct position. If you feel confident that you can unplug it and still be able to get the old switch out and new one back in give it a shot.)
- If all went well you’re holding the old switch attached to the harness plug in your hand. Carefully pry the plug off. Get your new switch ready. Your old switch should be in the OFF position so compare it to the new one and make sure it too is in the off position. If it is not, push a small flat screwdriver into the switch to depress the plunger and turn it to the OFF position. Now plug the new switch into the harness plug.
- Now you have to get the switch back in place. I came in the same way I went out. Switch end down in towards the center console and then into place sort of from the under side of the switch bracket. The two black plastic tabs on each side should be horizontal when sliding in as they are what you tighten the screws down onto. Don’t forget to reattach the small relay you removed and set aside… unless you want a mysterious rattle from within your dashboard. 😉
- Got it in? Tighten the small screws once again and put a dab of thread locker on the tops. I’d suggest avoiding the hard core thread locker here just in case you have to do this again sometime.
- Put the instrument cluster back in place and tighten the three screws at the bottom… make sure you have your clips lined up!
- Install the lower cluster trim piece and the two screws from the bottom and you should be done! Start the car. Your power windows and such should now work once again. Hopefully you didn’t drive the car (or not far) with your failed ignition switch or you may find yourself replacing the starter as well.
Good luck!
Darin Nederhoff
Founder, S-CARS.ORG
- Switch
- Here is a new switch and the small flat screwdriver used.
- The old switch can be seen in place in the mirror image. The red dots are the thread locked screws that need to be loosened.
- A very bad photo but if you look at the screw at the bottom of the pic you’ll see roughly how far to loosen them for switch removal. It will stick up about the thickness of a penny or nickel.
- New switch back in place. Just need to tighten the screws and put things back together… and add some threadlocker


You must be logged in to post a comment.