

Removing the ECU in the Audi UrS4 and UrS6 isn’t terribly difficult. Simply follow the step-by-step photos below. Installation is the reverse of removal (of course).

-
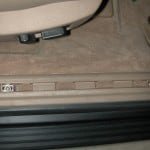
- STEP 2: Remove the three Phillips screws that hold the door sill trim in place.

-

- STEP 3: Move the door sill trim so that it clears the edge of the kick panel trim. Pry open the small circular plastic cover (not shown in photo) on the kick panel and remove the Phillips screw. Then pull the kick panel out and away from the door jamb (where it is held in place with metal clips.

-
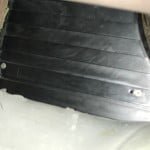
- STEP 4: Remove the floor mat. Pull back on the carpet as shown. Note: the carpet and padding will need to be carefully cut along the seam that runs along the transmission tunnel. Beneath the carpet will be two plastic covers held in place with two Phillips screws. Remove the screws. Remove the top plastic cover by pulling out and down (this piece has two tabs at the top that fit into plastic slots). Remove the lower cover.

-
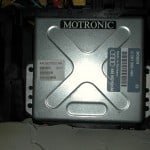
- STEP 5: The Bosch Motronic ECU is held in place with four Phillips screws. Remove the screws and carefully pull the ECU up and out enough to disconnect the manifold pressure hose and the wiring harness.

-
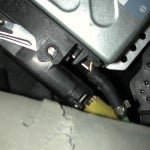
- STEP 6: Disconnect the ECU by first removing the pressure hose from the nipple on the ECU. (Note: this is an ideal location to plumb an aftermarket boost gauge.) Remove the wiring harness from the ECU by pulling down the metal lever shown in the photo above. The connector will pivot away from the ECU.

Thanks to Jimmy Pribble (Formerly of UrS4dotCOM) for this FAQ

You must be logged in to post a comment.